You should always sear your meat to achieve the best flavor and texture, but there are multiple ways to create an impeccable sear. Try reverse searing for a foolproof method that guarantees a perfect cook and crust every time. This technique involves slow-cooking the meat before finishing with a high-heat sear, and it can be done on both stovetops and grills, including gas grills.
To sear or not to sear…it’s honestly not even a question. For flavor’s sake, you should always sear your meat. Nothing boosts depth of flavor and texture like the Maillard reaction!
The Maillard reaction is a chemical process when certain foods are rapidly heated. This quick, high-temp process results in delicious-looking browning and a delightful crispiness that enhances the flavor of whatever is being cooked. The Maillard reaction is responsible for the tastiest parts of many foods—think of the perfect crust on a baguette, a crispy french fry, a toasted marshmallow, and a well-seared steak.
Searing meat creates a delicious, mouth-watering crust, but nailing the timing so the inside is cooked to the perfect temperature without over- (or under-) charring the outside can be a challenge, especially on a grill—even if you’re a grill master. Ultimately, it depends on how well you can manage the heat in your grill.
Enter the reverse sear—a nearly foolproof way to get the perfect cook and crust every time.
You can reverse sear on a grill or stovetop. Since we’re grill experts, we’ll focus on reverse searing on a grill. We’ll dig into:
Standard sear vs. reverse sear
When to reverse sear on a grill
How to reverse sear on a gas grill, including how to reverse sear steak on a gas grill
Let’s get cooking.
Standard Sear vs. Reverse Sear
We know that searing is a key step in the grilling process, but HOW you sear can depend on a few factors.
With a standard sear, you sear the outside before cooking the inside. With a reverse sear, you cook the inside first and finish off with a high-heat sear.
To help you decide whether to use the standard or reverse sear method, we created this comparison chart outlining how both methods work, pros and cons, and common mistakes:
What About Sous Vide?
Reverse searing is especially popular amongst sous vide-ers.
Sous vide is the easiest way to produce the perfect temperature gradient and most beautifully done piece of meat, but due to the unavoidable wetness of the meat upon removal from the bag, you will never achieve a proper sear, no matter how aggressively you pat it dry. Evaporation is essential to the perfect crusty sear.
MEAT MYTH: Searing does not lock in juices—it just enhances the flavors thanks to the Maillard reaction.
When to Reverse Sear on a Grill
While the standard searing method has obvious benefits (speed for one, but also the ability to butter baste), there are times when reverse searing on a grill is the superior choice.
You should opt for the reverse sear method if:
You are cooking thick pieces of meat, specifically anything larger than 1.5 inches.
You are cooking expensive cuts you are afraid to ruin with over- or under-cooking.
You are new to grilling steak.
You are cooking lean cuts prone to drying out, such as chicken breasts, pork tenderloin, and pork chops.
An even temperature gradient is very important to you.
GRILL SPOT TIP: Butter basting is typically best done on the stovetop, but you can do it on your grill too. Instead of searing directly on your grill grates, place your meat in a preheated, super-hot cast iron or un-enameled stainless steel pan. Add butter and herbs at the same time, and spoon it over your food as it sears. Make sure you have a good pair of grill gloves to keep your fingers from getting singed over the heat of your grill.
How to Reverse Sear on a Gas Grill
Reverse searing is most popular on the stovetop, but you can reverse sear on a gas grill as well.
Reverse searing on a gas grill is actually a fairly simple process:
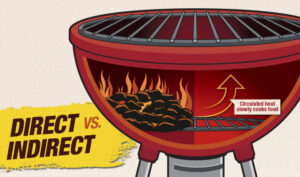
Turn your grill on and bring it up to 250F.
Turn off half of the burners to set up indirect cooking zones.
Arrange the meat on a wire rack set in a rimmed baking sheet.
Place the meat on the side without burners on.
Close the lid.
Cook, turning occasionally, until it’s about 10 to 15°F below your desired internal temperature—a good thermometer is essential for this process. Do your best not to lift the lid as you cook—at such low temperatures, you can easily lose precious heat. For approximate cooking duration, check out this steak temperature chart by Serious Eats. The times and temps listed below are for 1.5″ steaks cooked at 250°F (120°C) in an oven or on a grill:
Remove the meat and cover it with foil to keep it warm and bug-free.
Bring your grill up to the highest possible temperature and let it preheat, confirming the temperature with an infrared thermometer before returning the meat to the grill.
Sear the meat directly on the grill grates, turning frequently until the crust develops, approximately 1 – 2 minutes.
You can also reverse sear on a charcoal grill, but it’s a bit more work because you will have to add more charcoal when you get to the searing stage, and you’ll wait longer for the grill to get up to searing temps. It can also be a bit of a waste if you aren’t cooking a lot of food, since you will be using a lot of charcoal for a very brief cooking window.
Get Grilling
The reverse searing method is a great tool to add to your BBQ skill set, allowing you to consistently and easily produce perfectly cooked cuts of meat with ideal crusts. Whether you’re learning about the standard sear vs. reverse sear or need practical advice on how to reverse sear steak on a grill, we’re here to help every griller easily execute the perfect sear.